
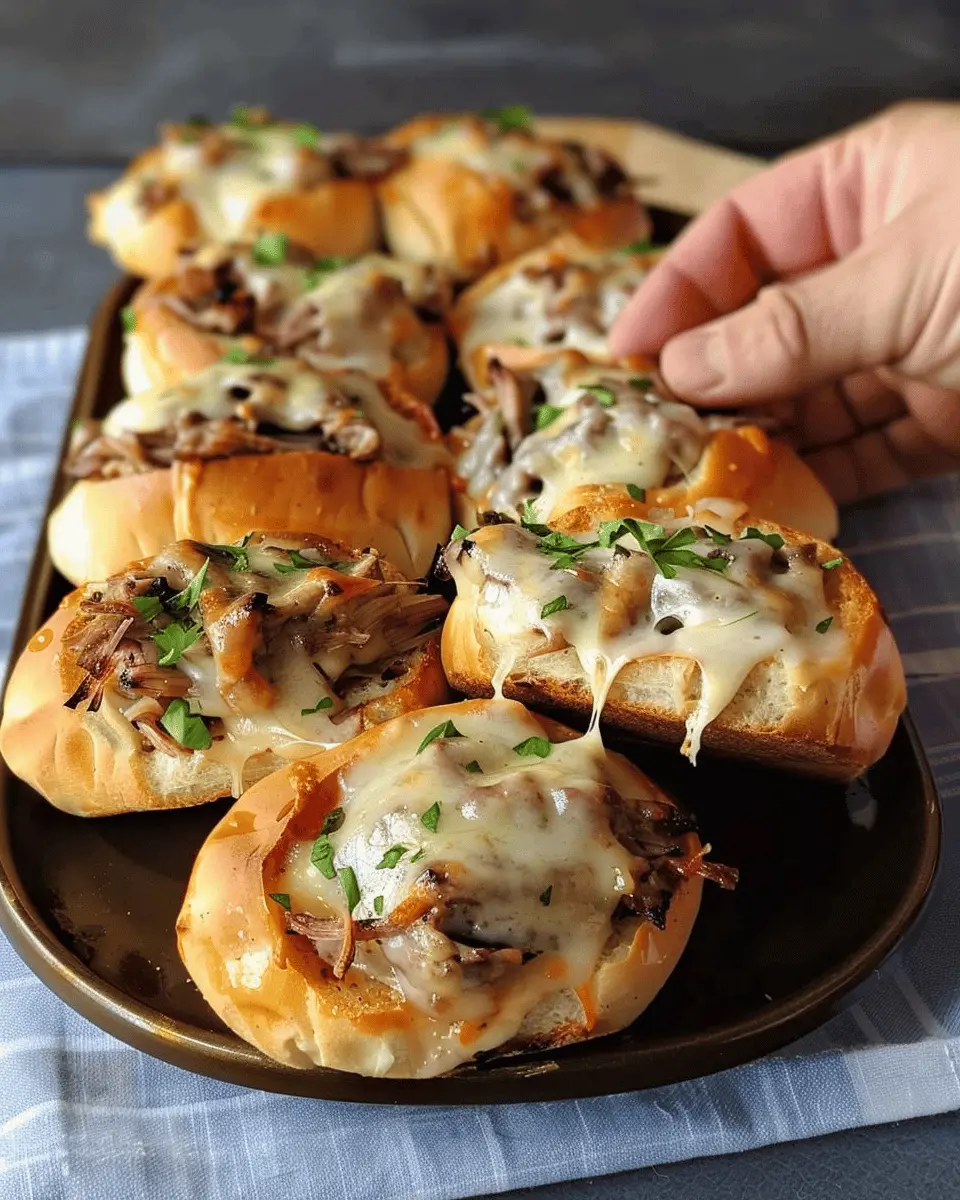
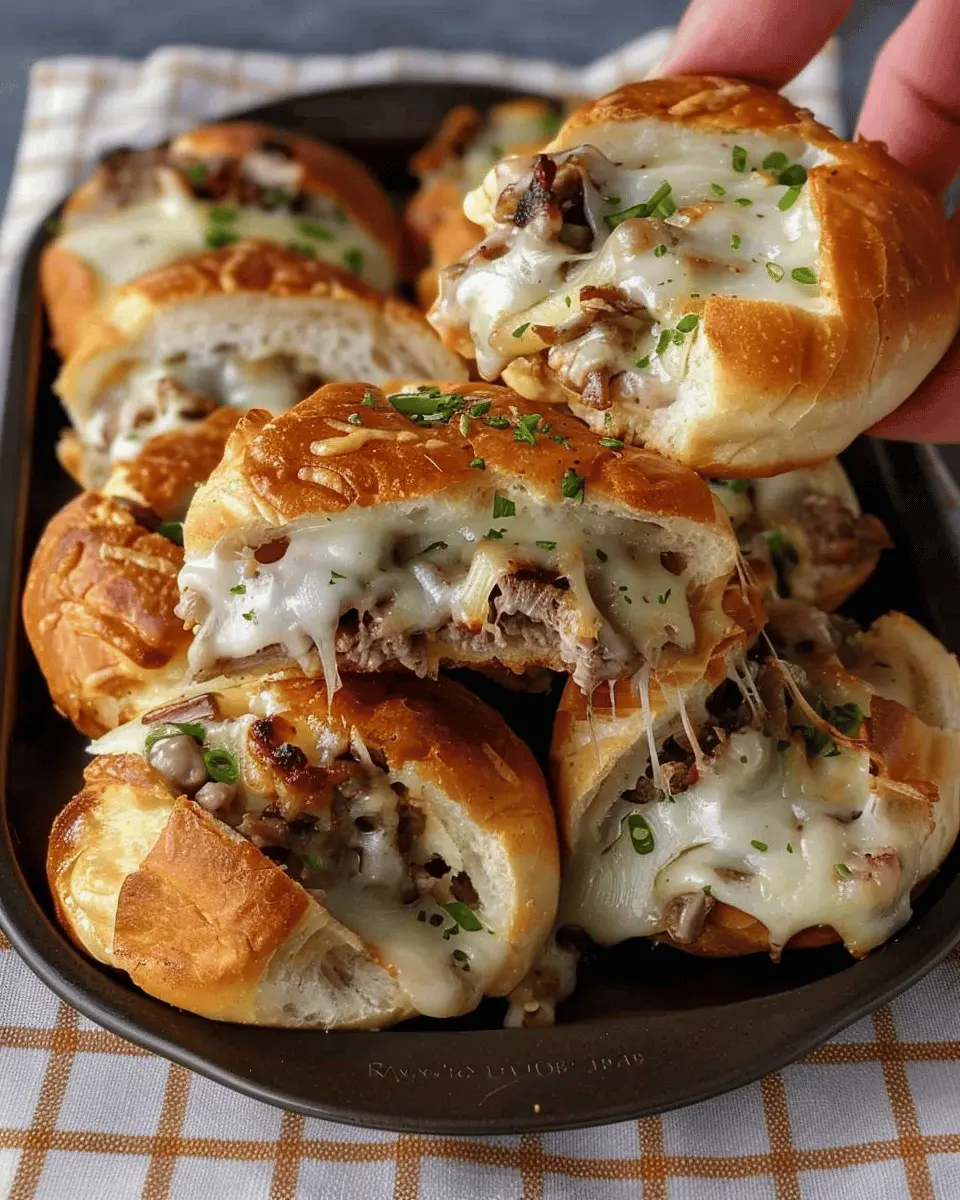
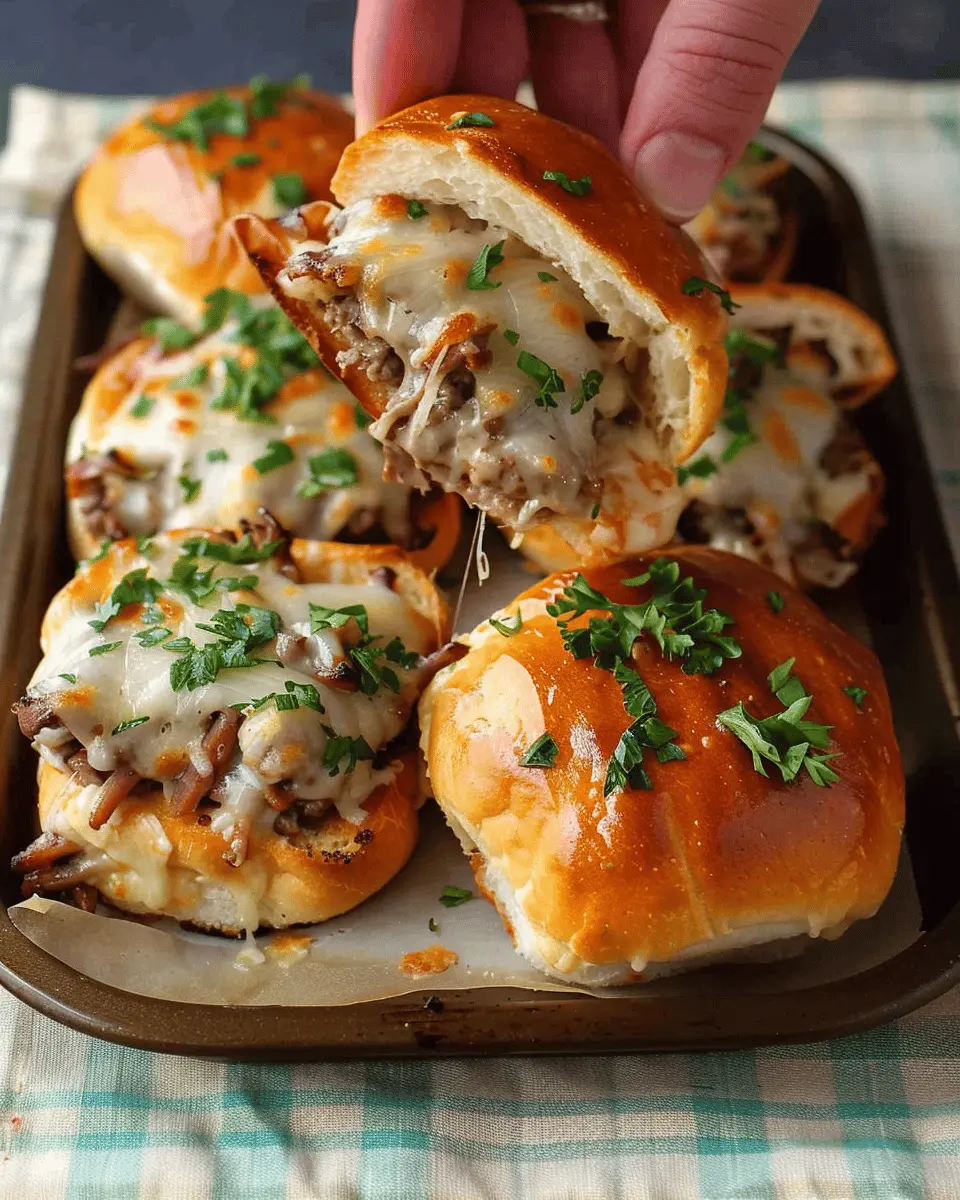
Introduction to Baked Philly Cheesesteak Sliders
If you’re looking to impress your friends or make mealtime more exciting, then Baked Philly Cheesesteak Sliders are the answer you’ve been searching for. These little bites of heaven combine the original flavors of the classic Philly cheesesteak with the convenience of sliders. They’re perfect for game day, parties, or even a cozy weeknight dinner!
Why Baked Philly Cheesesteak Sliders are a Game-Changer
Let’s be honest: sometimes you want the flavors you love without spending hours in the kitchen. That’s where Baked Philly Cheesesteak Sliders shine! These sliders are not only quick to prepare but also deliver on taste and texture.
- Flavorful Ingredients: The combination of tender beef, sautéed onions, and melted cheese stuffed into soft slider rolls makes for a delightful treat. Instead of traditional, you can even weave in healthier alternatives like turkey bacon or chicken ham, which adds a unique twist.
- Easy Prep: With just a handful of ingredients, you can whip these sliders up in no time. Prepping the filling while the oven preheats leaves you with more time to relax—perfect for the busy professional.
- Crowd-Pleaser: Whether it’s a casual gathering or a weekend meal, these sliders win over everyone from foodies to picky eaters. Each bite is a burst of flavor, making it hard to eat just one!
Did you know that sandwiches are often seen as a comfort food in many cultures? This versatile dish has evolved over generations and can be adapted to fit various dietary preferences, as detailed in this National Geographic article on food evolution.
Plus, when you bake these sliders, you get that melty cheese layer you crave without excessive frying, keeping things on the lighter side while still satisfying your cravings.
So, as you gather around the table or the couch for your next watch party, make sure to add Baked Philly Cheesesteak Sliders to your menu! They embody the essence of great food—simple, satisfying, and bursting with flavor. If you’re ready to dive into this mouthwatering recipe, let’s get started!
Ingredients for Baked Philly Cheesesteak Sliders
Essential ingredients for a cheesy delight
When it comes to making Baked Philly Cheesesteak Sliders, having the right ingredients is key to achieving that cheesy, savory delight we all crave. Here’s what you’ll need to gather before diving into this delicious recipe:
-
Slider Buns: Opt for soft, fresh slider buns that will hold up to the filling without falling apart. King’s Hawaiian rolls work great!
-
Beef: Sliced thinly or chopped, the beef is vital for that classic cheesesteak flavor. You could use ribeye or sirloin for the best results.
-
Turkey Bacon: Instead of traditional bacon, swap it out for turkey bacon to keep things lighter but still delicious.
-
Chicken Ham: Adds a unique twist and extra flavor. You can use this in combination with the beef for a tasty blend.
-
Onions and Peppers: Sautéed until they are soft and caramelized, these veggies bring an excellent sweetness to your sliders.
-
Cheese: Provolone or a blend of cheeses melts beautifully and tops off the sliders perfectly.
-
Seasoning: Don’t forget your favorite seasonings, like garlic powder, salt, and pepper, to enhance the flavor further.
These ingredients will set the stage for a hearty meal that’s perfect for gatherings or cozy nights in. If you’re looking for more inspiration, check out the benefits of using fresh ingredients for flavor-packed dishes!
Step-by-Step Preparation of Baked Philly Cheesesteak Sliders
Baked Philly Cheesesteak Sliders are a delightful way to savor the classic cheesesteak experience in a fun, shareable format. Ideal for gatherings or a cozy weeknight dinner, these sliders are simple to prepare and sure to impress. Let’s walk through each step to create this delicious dish, focusing on making the process as enjoyable as the final result.
Heat the skillet and season the steaks
To start, grab your trusty skillet and place it over medium heat. This is where the magic begins! While the skillet warms up, season your thinly sliced beef with a pinch of salt and freshly ground black pepper. If you want to elevate the flavor even more, consider adding a sprinkle of garlic powder or onion powder. Don’t rush; allowing the skillet to reach a good temperature is key to achieving that perfect sear on your beef.
You can read more about seasoning techniques in this cooking guide.
Cook the steaks and onions to perfection
Once your skillet is hot, add a drizzle of olive oil followed by the seasoned beef. It’s essential to keep the meat moving in the pan for even cooking. After a minute or two, toss in some sliced onions; they’ll add that lovely sweetness we all love in a Philly cheesesteak.
Cook everything together for about 5 to 7 minutes until the beef is just cooked through and the onions are softened. Keep an eye on the heat; you want a sizzle but not smoke. If you’d like to fine-tune your technique, check out expert advice on cooking beef from the USDA.
Preheat the oven and prepare the rolls
While your skillet works its magic, it’s time to get the oven ready. Preheat it to 350°F (175°C). As the oven heats, take your rolls—slider buns or hoagie rolls work splendidly—and slice them in half horizontally, keeping them connected. Brush the interior side with melted butter for an added richness that pairs beautifully with the filling.
Don’t forget to line a baking dish with parchment paper to make cleanup a breeze later on!
Slice and mix the filling ingredients
With the beef and onions cooked, it’s now time to bring everything together. In a bowl, combine the beef and onions with your choice of cheeses—traditional provolone or gooey mozzarella work wonderfully. If you’re feeling adventurous, try adding some chopped peppers or mushrooms for extra flavor.
Give it a gentle mix to ensure everything is well incorporated. You’ll want to make sure that every slider is bursting with flavor.
Assemble and bake the sliders until golden
Now onto the exciting part: assembling your sliders! Place the bottom half of the rolls in the baking dish and generously spoon the beef and cheese mixture over them. Place the top half of the rolls back on and brush them with a little more melted butter. If you want, a sprinkle of garlic powder or oregano can add that extra zing.
Cover the dish with foil and bake in your preheated oven for about 15 minutes or until the cheese has melted and the sandwiches are heated through. At this point, uncover the sliders, and bake for an additional 5 minutes for that golden, crispy finish we all love.
Once they’re out of the oven, let them cool for a few minutes (if you can resist!) before slicing into individual sliders. Serve warm and enjoy a taste of these delicious Baked Philly Cheesesteak Sliders with friends and family—trust me, they won’t last long!
And there you have it, an easy and satisfying recipe that’s perfect for any occasion. Whether it’s game day, a casual hangout, or just a cozy dinner at home, these sliders are bound to be a hit!
Variations on Baked Philly Cheesesteak Sliders
When it comes to Baked Philly Cheesesteak Sliders, the possibilities are deliciously endless! Whether you’re catering to dietary preferences or just in the mood for something different, here are two fun variations to try.
Vegetarian Delight with Portobello Mushrooms
For those days when you crave a hearty but meatless option, consider using portobello mushrooms as your star ingredient. These meaty caps not only have a rich flavor but also give a satisfying texture. Simply slice the mushrooms and sauté them with onions, garlic, and a sprinkle of thyme for added depth. Layer them in your sliders with provolone cheese and some roasted peppers. This vegetarian twist doesn’t skimp on flavor, and it’s a fantastic way to introduce more plant-based options into your meals. Plus, mushrooms are known for their health benefits, including being high in antioxidants! Interested in more vegetarian ideas? Check out this resource.
Spicy Kick with Jalapeños and Pepper Jack Cheese
If you enjoy a little heat, why not spice things up? Incorporate jalapeños into your Baked Philly Cheesesteak Sliders for a fiery punch. You can roast or sauté them to mellow their heat or leave them raw for an extra kick. Pair them with pepper jack cheese for a creamy, spicy melt that will elevate your sliders to the next level. Add a drizzle of your favorite hot sauce for good measure and watch everyone reach for seconds. Many hot sauces also boast health benefits, including boosting metabolism. Curious about the effects of spicy food? Visit this article.
These variations not only cater to different dietary needs but also keep your taste buds dancing. The best part? You can easily switch things up to match your mood or the season! Enjoy experimenting in the kitchen!
Cooking Tips and Notes for Baked Philly Cheesesteak Sliders
Tips for perfectly seasoned meat
For Baked Philly Cheesesteak Sliders, the key is in the meat seasoning. Start with thinly sliced beef – flank or ribeye works beautifully. Use a blend of salt, pepper, and a pinch of garlic powder to let the flavor shine. Want a tiny kick? A sprinkle of cayenne can brighten up the mix. Cooking the beef on high heat allows for those delicious caramelized bits. If you want to up the ante, consider adding Worcestershire sauce for that umami depth.
Notes on cheese choices and bread types
Choosing the right cheese is crucial for your sliders. Traditional options like provolone or whiz are popular, but if you crave creaminess, try Monterey Jack or even fontina. As for the bread, go for soft slider rolls, such as Hawaiian sweet rolls or even pretzel buns for a twist! These hold up well against the meat and melted cheese, providing the perfect balance of flavors.
For more delicious tips, check out Serious Eats or Bon Appétit for inspiration!
Serving Suggestions for Baked Philly Cheesesteak Sliders
Fun sides to accompany your sliders
When serving Baked Philly Cheesesteak Sliders, think about sides that will complement the rich flavors of the sliders. Here are some exciting options:
- Sweet potato fries: Their natural sweetness and crispy texture provide a delightful contrast.
- Coleslaw: A tangy slaw adds crunch and brightness, balancing the savory sliders perfectly.
- Corn on the cob: Grilled or boiled, corn is a fantastic choice that adds a bit of summer to your meal.
- Pickles: The acidity from pickles can cut through the richness of the cheese and meat, making every bite even more enjoyable.
Creative garnishes to enhance presentation
Presentation matters, especially if you’re hosting friends! Here are a few garnish ideas to elevate your Baked Philly Cheesesteak Sliders:
- Fresh herbs: A sprinkle of chopped parsley or cilantro can add vibrant color and freshness.
- Sliced jalapeños: For those who like a kick, this adds heat and a pop of color.
- Toothpicks: Not only do they hold your sliders together, but they can also be topped with a cherry tomato or olive for a fun touch.
Adding these sides and garnishes will surely impress your guests and make your ‘sliders night’ a hit! For more garnishing ideas, check out this resource.
Time Breakdown for Baked Philly Cheesesteak Sliders
When it comes to making delicious Baked Philly Cheesesteak Sliders, knowing how long each step takes can make your cooking experience smoother. Here’s a quick rundown:
Preparation Time
You’ll need about 15 minutes to gather your ingredients and prep your sliders. This includes chopping up your bell peppers, onions, and slicing the Turkey Bacon into manageable pieces. If you want to save time, consider prepping these ingredients a day before.
Cooking Time
Once you’re ready, allow around 25-30 minutes for baking. This time will ensure your cheese melts perfectly and those flavors meld beautifully.
Total Time
In just about 45-50 minutes, you can have your Baked Philly Cheesesteak Sliders ready to impress your friends or family. Quick, tasty, and perfect for any gathering! For more slider inspiration, check out The Spruce Eats for creative variations.
Nutritional Facts for Baked Philly Cheesesteak Sliders
Calories and macronutrient breakdown
Baked Philly Cheesesteak Sliders are an indulgent treat, packing in approximately 300 calories per serving. They can be broken down into macronutrients as follows:
- Protein: 20g (thanks to the delicious combination of turkey bacon and chicken ham)
- Carbohydrates: 30g (primarily from the soft slider buns)
- Fat: 12g (a mix of cheese and condiments)
These sliders offer a satisfying balance of flavors while delivering protein that keeps you energized throughout your busy day.
Tips for healthier modifications
Looking to lighten things up a bit? Here are some simple tweaks to make your Baked Philly Cheesesteak Sliders a bit healthier:
- Opt for whole grain buns: This increases fiber intake and adds essential nutrients.
- Use leaner meats: Consider swapping turkey bacon for lean turkey breast or using less cheese.
- Add veggies: Incorporate bell peppers or spinach for extra vitamins without many calories.
For further reading on healthy eating, check out resources from Healthline. Making these small adjustments can enhance your slider experience while keeping you on track with your health goals!
FAQs about Baked Philly Cheesesteak Sliders
Can I make the filling ahead of time?
Absolutely! Preparing the filling for your Baked Philly Cheesesteak Sliders in advance is a great way to save time. You can sauté the beef, turkey bacon, and vegetables, then let the mixture cool before storing it in an airtight container in the fridge for up to 3 days. When you’re ready to assemble your sliders, just reheat the filling on the stovetop or in the microwave. It’s an easy way to get dinner on the table without the last-minute hassle.
What can I substitute for pickled peppers?
If pickled peppers aren’t your thing, don’t worry! There are plenty of alternatives to add flavor and zing. Consider using:
- Banana Peppers: These offer a mild tanginess.
- Jalapeños: If you like a bit of heat, sliced jalapeños work beautifully.
- Roasted Red Peppers: For a sweeter profile, roasted red peppers add a lovely depth.
Don’t hesitate to experiment! The beauty of Baked Philly Cheesesteak Sliders is in making them your own.
How do I store leftovers?
Storing leftovers is a breeze. Place any uneaten sliders in an airtight container and pop them in the fridge, where they’ll last for about 2-3 days. For longer storage, wrap the sliders tightly in plastic wrap and freeze them for up to a month. When you’re ready to enjoy them again, simply thaw in the fridge overnight and then reheat in the oven for a crispy finish.
Curious about the best way to reheat those sliders? Check out this guide from Food Network for more tips on keeping your leftovers delicious!
Conclusion on Baked Philly Cheesesteak Sliders
Recap of the joy of homemade sliders
There’s something undeniably delightful about creating your own Baked Philly Cheesesteak Sliders at home. Whether it’s for a cozy night in or entertaining friends, these sliders are not only satisfying but also fun to prepare. The savory combination of tender beef, melted cheese, and perfectly baked rolls creates a flavor explosion that’s hard to resist.
Imagine the smiles on your friends’ faces as they bite into these warm, cheesy delights. Plus, making them at home allows you to customize ingredients to your liking—add more veggies, swap the meat, or experiment with different cheeses. Want to elevate your experience? Consider pairing them with crunchy pickles or potato chips for the perfect crunch. Dive into the world of homemade sliders and discover the joy they bring!
For more tips on slider variations, check out this article on creative slider options.
PrintBaked Philly Cheesesteak Sliders with Turkey Bacon and Chicken Ham

Delicious baked sliders featuring turkey bacon and chicken ham, perfect for a delightful meal.
- Prep Time: 20 minutes
- Cook Time: 30 minutes
- Total Time: 50 minutes
- Yield: 12 servings
- Category: Main Dish
- Method: Baking
- Cuisine: American
- Diet: Gluten-Free
Ingredients
- 12 slider buns
- 1 pound turkey bacon
- 1 pound chicken ham
- 2 cups provolone cheese, shredded
- 1 cup bell peppers, sliced
- 1 cup onions, sliced
- 2 tablespoons olive oil
- 1 teaspoon garlic powder
- 1 teaspoon onion powder
- 1 teaspoon black pepper
Instructions
- Preheat the oven to 350°F (175°C).
- In a skillet, heat olive oil and sauté onions and bell peppers until soft.
- Add turkey bacon and chicken ham, and cook until heated through.
- Assemble sliders by placing the meat mixture on slider buns and topping with provolone cheese.
- Brush the tops of the sliders with melted butter and garlic powder mixture.
- Bake in the oven for 10-15 minutes or until the cheese is melty and bubbly.
Notes
- These sliders can be made ahead of time and reheated before serving.
- Feel free to customize the toppings or add pickles.
Nutrition
- Serving Size: 1 slider
- Calories: 310
- Sugar: 2g
- Sodium: 800mg
- Fat: 18g
- Saturated Fat: 6g
- Unsaturated Fat: 8g
- Trans Fat: 0g
- Carbohydrates: 30g
- Fiber: 1g
- Protein: 20g
- Cholesterol: 60mg