Introduction to Homemade Cheesy Garlic Breadsticks
Have you ever found yourself at a pizza place, waiting eagerly for that first bite of warm, cheesy garlic bread? Just the thought of it can make anyone’s mouth water. Homemade cheesy garlic breadsticks bring that same delight to your kitchen, making it easier than ever to enjoy this crowd-pleaser at home. Whether you’re hosting a game night or looking for a cozy dinner for one, these breadsticks are a delicious addition to any meal.
What’s the allure of cheesy garlic breadsticks?
The magic lies not just in their aroma and cheesy goodness but also in how quick and simple they are to whip up. Imagine the golden crust, the melting cheese, and that irresistible hint of garlic wafting through your home—pure comfort! According to a study by the National Cheese Institute, Americans consume nearly 34 pounds of cheese per person each year, making cheesy dishes a staple in our diets. By making your own breadsticks, you can customize the flavors to suit your preferences.
Have you ever thought about how versatile homemade cheesy garlic breadsticks can be? They can be enjoyed as a side dish, a snack, or even an appetizer. Want to kick it up a notch? Pair them with marinara sauce for dipping, or sprinkle some fresh herbs like parsley or oregano to enhance the flavor. Numerous recipes are available online, providing countless ways to incorporate unique twists. Check out this great resource on how to elevate your cheesy garlic bread for inspiration.
In addition to their irresistible taste, making your own cheesy garlic breadsticks serves a practical purpose—saving money! With just a few ingredients—like flour, cheese, garlic, and butter—you can create a batch for a fraction of the price you’d pay at a restaurant. Plus, when you bake at home, you know exactly what goes into your food. How can you resist that?
So, are you ready to ditch those store-bought options? Let’s dive into the exciting world of making homemade cheesy garlic breadsticks. Your taste buds are about to thank you!

Ingredients for Homemade Cheesy Garlic Breadsticks
If you’re in the mood for something cheesy, garlicky, and utterly delicious, then these homemade cheesy garlic breadsticks are just what you need. It’s a simple recipe that delivers maximum flavor with minimal effort. Here’s what you’ll need to whip up this delightful snack:
-
Breadstick Dough: You can make this from scratch using all-purpose flour, yeast, water, and a pinch of sugar, or you can use store-bought dough for a quick option.
-
Garlic: Fresh garlic is best for that robust flavor, but garlic powder works too if you’re in a pinch.
-
Cheese: Mozzarella is a classic choice, but feel free to mix it with cheddar for a richer taste.
-
Butter: Unsalted butter is preferred to control the saltiness.
-
Seasonings: A sprinkle of Italian herbs, salt, and pepper enhance the flavor.
-
Toppings: Consider adding toppings like Turkey Bacon or Chicken Ham for an extra savory bite.
Ready to indulge in these homemade cheesy garlic breadsticks? Grab your ingredients, and let’s get baking! For more delicious recipes, check out BBC Good Food or Food Network.
Preparing Homemade Cheesy Garlic Breadsticks
Who can resist the temptation of homemade cheesy garlic breadsticks? They are both a delicious side that pairs perfectly with your favorite soups and salads or serve as an irresistible snack on their own. Whether it’s a cozy movie night or a casual dinner party, these breadsticks will impress your friends and family. Let’s get started on preparing them from scratch!
Activate the yeast
The first step to creating your homemade cheesy garlic breadsticks is activating the yeast, which is crucial for giving your bread the perfect rise. Start by gathering 1 packet of active dry yeast and dissolving it in 1 cup of warm water (about 110°F). Warm water is key—too hot, and you risk killing the yeast; too cold, and it won’t activate. For added richness, you can mix in 1 tablespoon of sugar to feed the yeast. Let it sit for about 5-10 minutes until it becomes frothy, indicating it’s ready to work its magic.
Combine the dry ingredients
While your yeast is doing its thing, turn your attention to the dry ingredients. In a large mixing bowl, combine 2 ½ cups of all-purpose flour, 1 teaspoon of salt, and 1 teaspoon of garlic powder. The garlic powder not only enhances the flavor but also harmonizes with the fresh garlic you’ll add later. Whisk these ingredients together until they’re well blended. This dry mix is the foundation of your breadsticks and sets the stage for a flavorful outcome.
Form the dough
Now that your yeast is activated and your dry ingredients are ready, it’s time to form the dough. Pour the yeast mixture into your dry ingredients and gently combine using a wooden spoon or your hands. The mixture will be slightly sticky—don’t worry! Once incorporated, knead the dough on a floured surface for about 5-7 minutes until it becomes smooth and elastic. This process develops the gluten, giving your breadsticks their delightful texture. If you feel the dough is too sticky, sprinkle a little more flour as needed. Once it’s nicely kneaded, place it in a greased bowl, cover it with a cloth or plastic wrap, and let it rise in a warm place for 1 hour, or until it’s doubled in size.
Prepare the garlic butter
While waiting for the dough to rise, let’s prepare the star of the show—garlic butter! In a small saucepan, melt ½ cup of unsalted butter over low heat. Add 4 minced garlic cloves and a pinch of salt, allowing the garlic to infuse the butter for about 2-3 minutes. This step not only adds a delectable flavor but also creates a lovely aroma that’ll have everyone asking what’s cooking. Once ready, set it aside as you’ll use it to brush over the breadsticks before and after baking.
Shape and bake the breadsticks
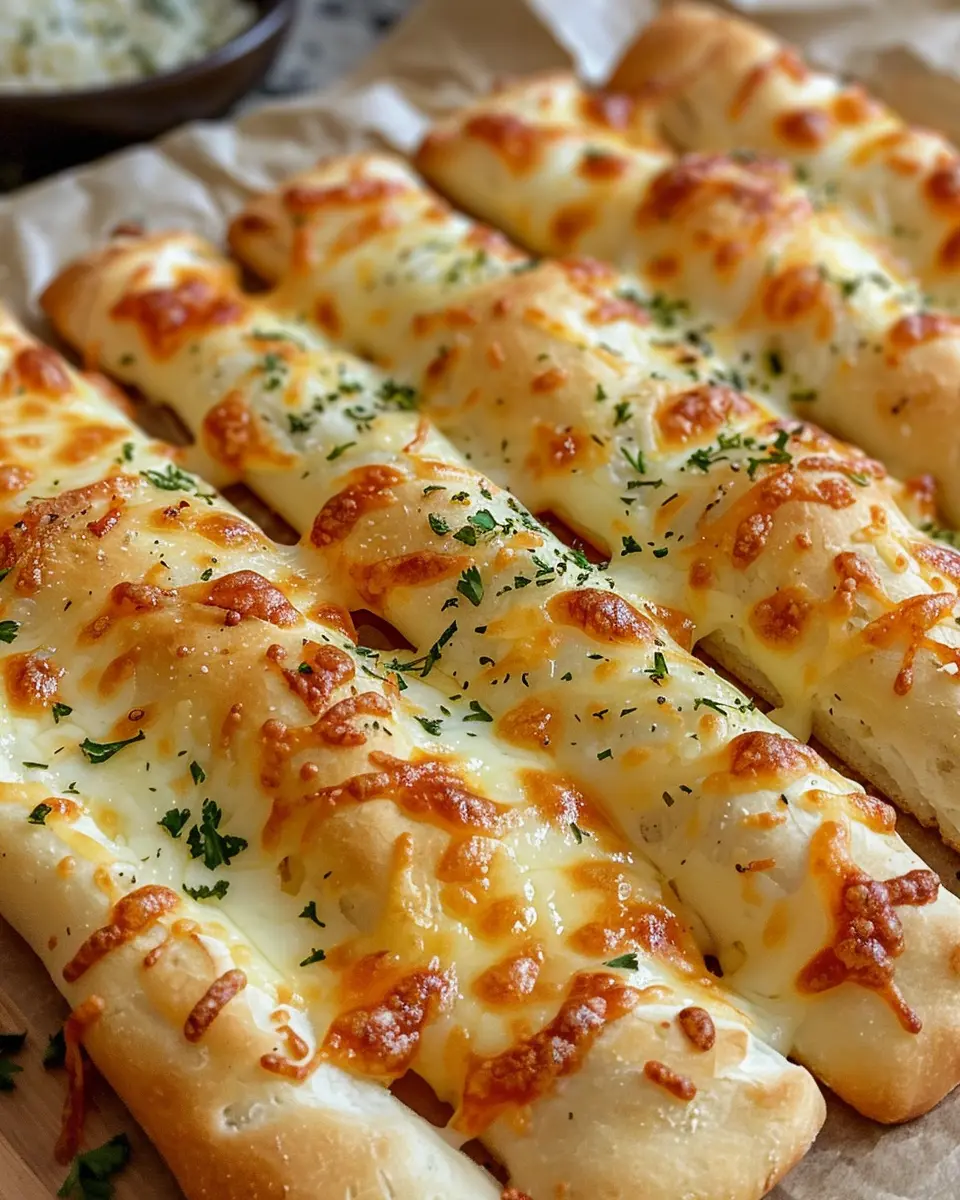
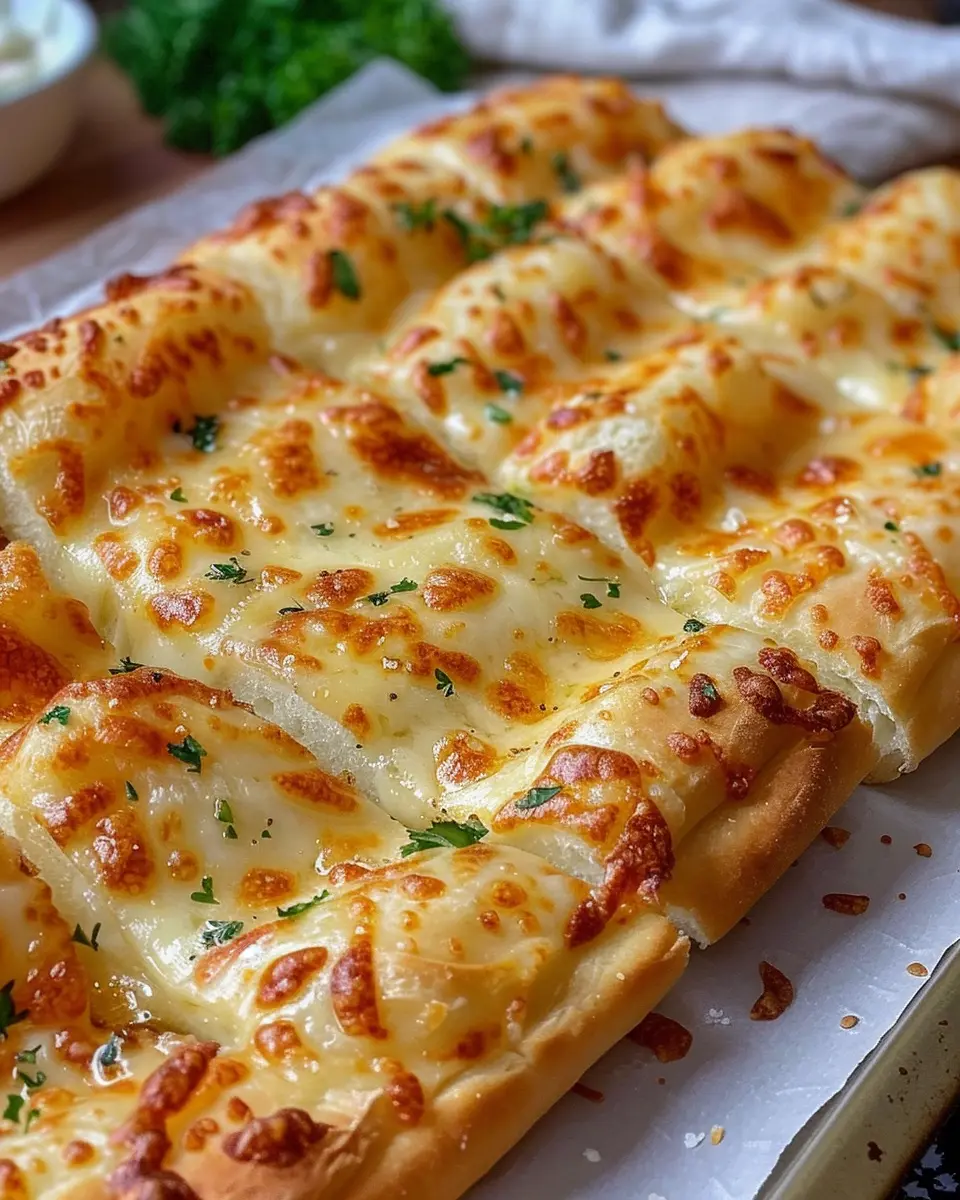
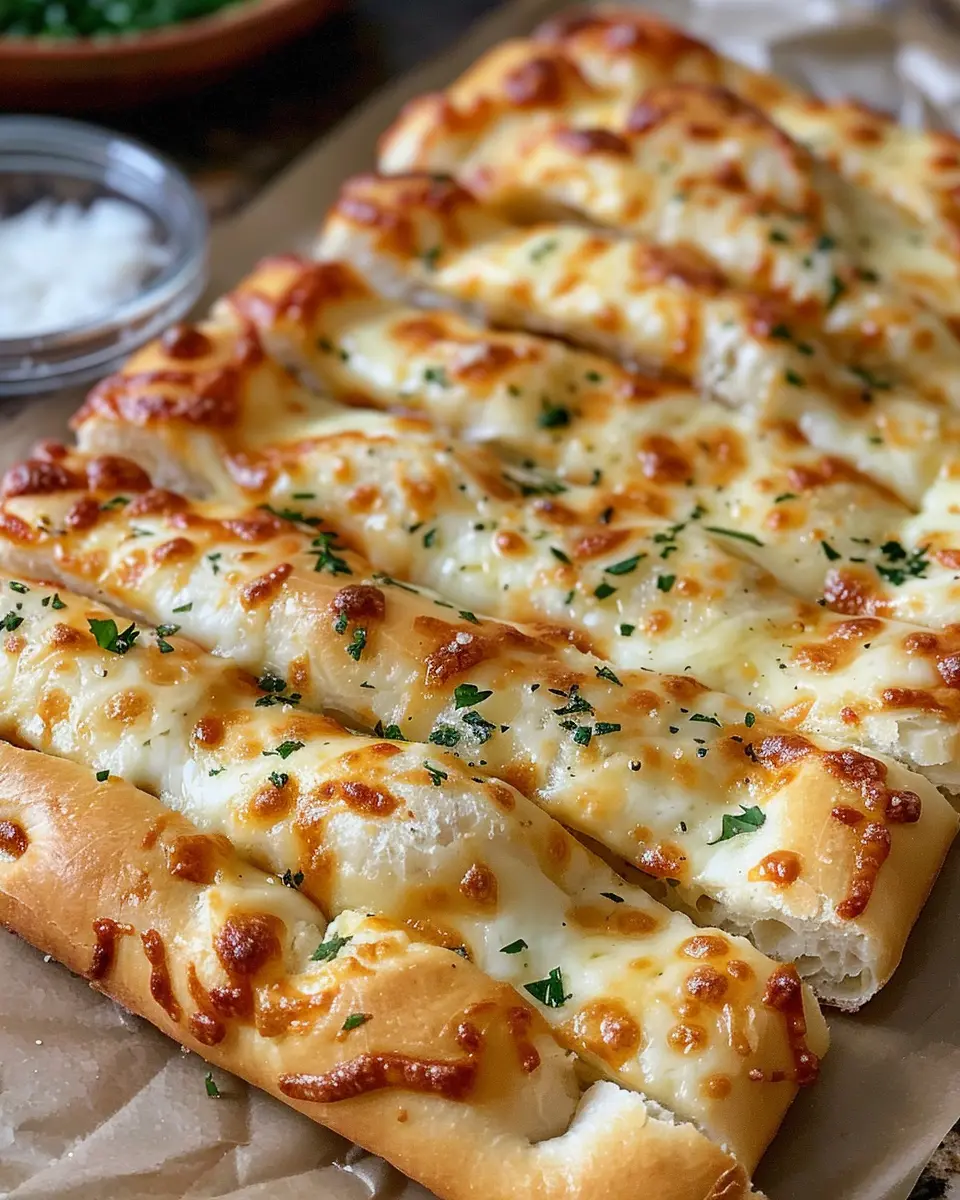
After the dough has risen, punch it down gently to remove excess air. On a floured surface, roll it out into a rectangle about ½-inch thick. Use a pizza cutter or a knife to slice the dough into strips, each around 1 inch wide. Now, take each strip and twist it for a fun garlicky aesthetic. Arrange the twists on a baking sheet lined with parchment paper. Brush them generously with your prepared garlic butter and sprinkle some grated cheese on top—this is what makes them cheesy garlic breadsticks!
Preheat your oven to 375°F (190°C). Bake the breadsticks for about 15-20 minutes, or until they are golden brown and the cheese is bubbly. Let them cool slightly, then brush with more garlic butter and sprinkle with chopped parsley for a touch of freshness.
And there you have it! Delicious, warm, homemade cheesy garlic breadsticks straight from your oven. Share them with friends, serve them at dinner, or simply indulge—you deserve it! For tips on serving, check out The Spruce Eats for ideas on pairing. Happy baking!
Variations on Homemade Cheesy Garlic Breadsticks
There are so many fun ways to jazz up your homemade cheesy garlic breadsticks! Whether you’re craving something with a kick or want to infuse some aromatic goodness, these variations are sure to delight your taste buds and impress your dinner guests.
Spicy Cheesy Garlic Breadsticks
If you’re the kind of person who enjoys a bit of heat, consider adding red pepper flakes or even jalapeños to your homemade cheesy garlic breadsticks. Here’s how to spice things up:
- Ingredients: Mix in 1-2 teaspoons of red pepper flakes into your garlic butter or sprinkle diced jalapeños on top before baking.
- Cheese Choices: Sliced pepper jack cheese can add a creamy kick. Alternatively, consider using a spicy cheese blend for added depth.
This version pairs excellently with a refreshing dip, such as guacamole or a cool ranch dressing to balance out the heat.
Herb-Infused Cheesy Garlic Breadsticks
Looking to add a fresh twist? Herb-infused homemade cheesy garlic breadsticks are a fantastic option. Using herbs not only adds flavor but also a delightful aroma.
- Herb Suggestions: Try incorporating finely chopped fresh herbs like rosemary, thyme, or parsley into your garlic butter. Approximately 2 tablespoons of your favorite herb will do the trick.
- Garnishing: After baking, sprinkle some herbs on top for that extra pop of flavor and a visually appealing dish.
These herb-infused delights can also serve as a lovely appetizer, complementing many main dishes.
So, are you ready to transform your simple garlic breadsticks into something extraordinary? With just a few tweaks, you’ll have everyone asking for seconds! For more recipe inspiration, check out sites like Serious Eats and Food Network.
Cooking Tips and Notes for Homemade Cheesy Garlic Breadsticks
When it comes to making homemade cheesy garlic breadsticks, small adjustments can make a big difference in flavor and texture. Here are some helpful tips:
Choose the Right Cheese
For a melty, gooey experience, opt for a combination of mozzarella and parmesan. Mozzarella provides elasticity, while parmesan adds a rich, sharp flavor that elevates your breadsticks.
Let the Dough Rise
Allowing your dough to rise properly is crucial. It not only enhances the texture but also develops a deeper flavor. The ideal rise time is around 1 to 2 hours in a warm place—consider placing it near a sunny window.
Brush with Garlic Butter Generously
Don’t hold back on the garlic butter! Brush a generous amount on both the dough before baking and right after it comes out of the oven. This double dose will ensure every bite is bursting with flavor.
Experiment with Herbs
Feel free to personalize your homemade cheesy garlic breadsticks by adding herbs. Fresh basil or oregano sprinkled on top before baking can create a delightful aroma and taste.
These tips will help you achieve the best breadsticks, perfect for dipping in marinara sauce or enjoying as a side at any meal. For additional inspiration, check out resources like The Kitchn for innovative ideas!
Serving Suggestions for Homemade Cheesy Garlic Breadsticks
When it comes to enjoying homemade cheesy garlic breadsticks, the possibilities are endless! These breadsticks aren’t just a delightful side; they can be the star of your meal. Here are some fun serving suggestions that will elevate your dining experience.
Pair with Soup or Salad
Serve your breadsticks alongside a hearty bowl of tomato soup or a crisp Caesar salad. The garlic flavor complements the freshness of the greens or the rich texture of the soup beautifully. So comforting, right?
Creative Dips
Why not elevate the flavor game with some dips? Consider serving breadsticks with marinara sauce, garlic butter, or even a pesto dip. Each option adds a new dimension to your cheesy delight. For a refreshing twist, try tangy ranch dressing or zesty feta dip!
Lunchbox Treat
Looking for something easy to pack for lunch? Slice your homemade cheesy garlic breadsticks into smaller portions and add them to a lunchbox with chicken ham or turkey bacon slices for a filling, delightful midday meal.
Experiment with these ideas and discover your favorite combinations! Your friends will be begging for the recipe, so be sure to share your delicious creations online. If you want more breadstick inspiration, check out this article on perfect garlic bread pairings.
Time Breakdown for Homemade Cheesy Garlic Breadsticks
Preparation Time
Getting your homemade cheesy garlic breadsticks ready is easier than you think! You’ll need around 15 minutes to gather your ingredients, mix the dough, and get those garlic flavors blooming. Set the mood with some music or a podcast; this is your time to shine!
Baking Time
Now, let’s talk about the oven magic! The baking process will take roughly 15-20 minutes. Keep an eye on the cheese—when it’s bubbly and golden, it’s time to pull those breadsticks out and let the delicious aroma fill your kitchen.
Total Time
From start to finish, you’re looking at about 30-35 minutes to whip up these delightful cheesy snacks. Perfect for a quick appetizer or a cozy night in! Planning to make these for friends? You’ll have them raving in no time. For more details on ingredient selections, check out this handy guide for tips on the best cheeses to use. Enjoy your cooking adventure!
Nutritional Facts for Homemade Cheesy Garlic Breadsticks
When you’re whipping up a batch of homemade cheesy garlic breadsticks, it’s not just about that irresistible aroma wafting through your kitchen. Let’s take a closer look at the nutritional values to help you indulge wisely!
Calories
Each serving of these delectable breadsticks packs approximately 200 calories. This makes them a satisfying yet manageable treat, perfect for game nights or cozy dinners.
Protein
You can expect around 8 grams of protein per serving, largely thanks to the cheese and bread. It’s a great way to sneak in some protein alongside your favorite pasta dish or salad!
Sodium
With roughly 450 mg of sodium, these homemade cheesy garlic breadsticks might be a little salty for some. Considering your daily intake is around 2,300 mg, it’s easy to enjoy these without overdoing it.
For more detailed nutritional guidance, you might find resources like the FDA’s Nutrition Facts and USDA FoodData Central beneficial. Enjoy your cooking!
FAQs about Homemade Cheesy Garlic Breadsticks
Can I make the dough ahead of time?
Absolutely! Making the dough for your homemade cheesy garlic breadsticks ahead of time is a great way to save on prep time. You can prepare the dough, let it rise, and then store it in the refrigerator for up to 24 hours. Just remember to bring it to room temperature for about 30 minutes before shaping and baking. This allows the yeast to regain its activity, giving you that perfect fluffy texture.
What can I serve with cheesy garlic breadsticks?
These delightful homemade cheesy garlic breadsticks are incredibly versatile and can complement various dishes. Consider pairing them with:
- Marinara sauce for dipping — it’s a classic!
- A fresh salad tossed in vinaigrette for a lighter option.
- Soup such as minestrone or tomato basil for a hearty meal.
- Pasta dishes, particularly those with creamy or tomato-based sauces, are an excellent match.
Mix and match to find your perfect pair! Whether it’s a family dinner or a casual gathering with friends, breadsticks can elevate any meal.
How do I store leftover breadsticks?
If you manage to have leftovers (though it’s unlikely!), storing them is easy. Wrap each homemade cheesy garlic breadstick in plastic wrap or place them in an airtight container. They can be stored at room temperature for up to 2 days. For longer storage, consider freezing them. Just place them in a freezer bag, and they can last up to 3 months. When you’re ready to enjoy them again, thaw and warm them in the oven for that fresh-from-the-oven taste.
For more tips on storage and serving, check out resources from the Food Network or Serious Eats.
Conclusion on Homemade Cheesy Garlic Breadsticks
In conclusion, homemade cheesy garlic breadsticks are an irresistible addition to any meal, delivering the perfect blend of flavors and textures. Whether you’re hosting a casual dinner, prepping for game day, or simply craving a delicious snack, these breadsticks are sure to impress. The combination of gooey cheese and aromatic garlic makes each bite a delightful experience.
Moreover, they’re easy to customize! Experiment with different cheeses or add your favorite herbs to elevate the taste. Don’t forget to share your creations and tips with friends, and check out this guide to creating the perfect cheese blend for more ideas. Enjoy your cheesy adventure!
PrintHomemade Cheesy Garlic Breadsticks Made Easy for Everyone

Enjoy the deliciousness of homemade cheesy garlic breadsticks that are easy to make.
- Prep Time: 15 minutes
- Cook Time: 20 minutes
- Total Time: 35 minutes
- Yield: 12 breadsticks
- Category: Appetizer
- Method: Baking
- Cuisine: American
- Diet: Vegetarian
Ingredients
- 2 cups all-purpose flour
- 1 tablespoon sugar
- 1 teaspoon salt
- 1 teaspoon garlic powder
- 1 cup warm water
- 2 tablespoons olive oil
- 1 cup shredded mozzarella cheese
- 1/4 cup grated Parmesan cheese
- 2 tablespoons fresh parsley, chopped
Instructions
- Preheat your oven to 400°F (200°C).
- In a bowl, combine flour, sugar, salt, and garlic powder.
- Add warm water and olive oil, and mix until a dough forms.
- Knead the dough on a floured surface for about 5 minutes.
- Roll out the dough into a rectangle and place on a baking sheet.
- Spread shredded mozzarella on top, followed by Parmesan and parsley.
- Bake for 15-20 minutes or until golden brown.
Notes
- Serve hot with marinara sauce for dipping.
- Customize with different types of cheese if desired.
Nutrition
- Serving Size: 1 breadstick
- Calories: 150
- Sugar: 1g
- Sodium: 300mg
- Fat: 6g
- Saturated Fat: 2g
- Unsaturated Fat: 3g
- Trans Fat: 0g
- Carbohydrates: 20g
- Fiber: 1g
- Protein: 5g
- Cholesterol: 10mg